Lean To Shed Plans Free
小屋への傾いた建物は、あなたがシンプルだが効率的なデザインを好むなら良い選択です。 そのため、このような弊順の嶄で、弊順の嶄で、弊順の嶄で、弊順の嶄で、弊順の嶄で、弊順の? このような予備的なステップは、どのような木工プロジェクトにも不可欠です。
小屋の大きさは必要に応じて調節しますが、このDIYの記事で説明したのと同じテクニックを使用する必要があります。 さらに、1人が部品を所定の位置に固定し、もう1人がネジを打ち込む必要があるため、建設時には友人に手伝ってもらうことをお勧めします。 木製のパーツは両端を合わせてからビスを打つと、見た目がきれいに仕上がります。
目次:
PART1: 小屋への傾斜地計画
PART2: 小屋への傾斜地計画
PART3: 小屋への傾斜地計画。 Shed door plans
Building a lean to shed
- Materials
- Tools
- Time
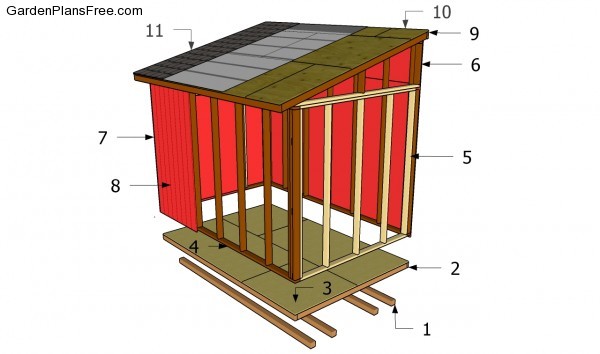
- 1 – 4 pieces of 4×4 lumber – 144″ SKIDS
- 2 – 2 peices of 2×6 lumber – 144″, 10 pieces of 2×6 lumber – 93″ JOISTS
- 3 – 3 pieces of 3/4″ plywood – 4×8′ FLOORING
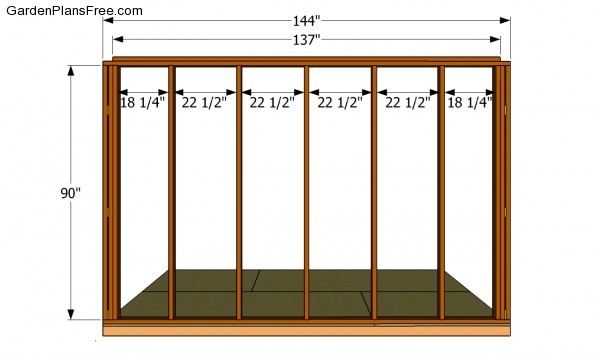
- 4 – 11 pieces of 2×4 lumber – 90″, 2 peices – 144, 1 piece – 137″ SIDE WALL
- 5 – 5 pieces of 2×4 lumber – 90″, 1 piece – 89″, 1 piece – 92 1/2″, 1 piece – 96″ BACK WALL
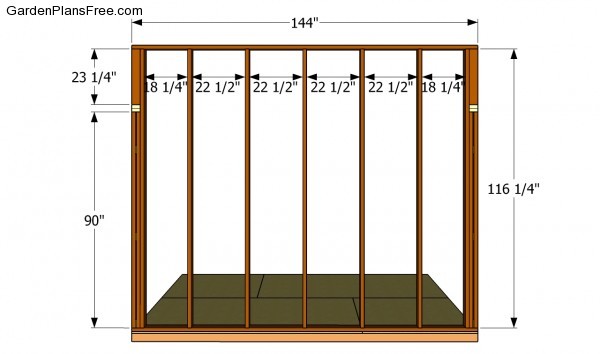
- 6 – 9 pieces of 2×4 lumber – 116 1/2″, 2 pieces – 144″ SIDE WALL
- 7 – 6 pieces of 2×4 – 90″, 1 piece – 89″, 1 piece – 92 1/2″, 1 piece – 96″, 3 pieces – 12″ FRONT WALL
- 8 – 13 pieces of 5/8″ grooved plywood SIDING
- 9 – 11 pieces of 2×4 lumber – 110 3/4″ RAFTERS
- 10 – 5 pieces of 3/4″ grooved plywood – 4×8′ ROOF DECKING
- 9 – 150 sq ft of roofing felt, 150 sq ft of asphalt shingles ROOFING
- 4 pieces of 4×4 lumber – 12 ft
- 2 pieces of 2×6 lumber – 12 ft
- 10 pieces of 2×6 lumber – 8 ft
- 8 pieces of ¾” plywood – 4’x8′
- 33 pieces of 2×4 lumber – 8 ft
- 16 pieces of 2×4 lumber – 12 ft
- 7 pieces of 1×4 lumber – 8 ft
- 12 pieces of 5/8″ T1-11 siding – 4’x8′
- 150 sq ft of roofing felt, 150 sq ft of asphalt shingles
- 100 pieces of 2 ½” screws
- 800 pieces of 3 ½” screws
- 1000 pieces of 1 5/8″ screws
- 1000 pieces 8d nails
- Hinges + door latch
- Construction glue
- Rafter ties
- 1 ½” structural screws
- 60 ft of drip edges
- One Weekend
Made from this plan
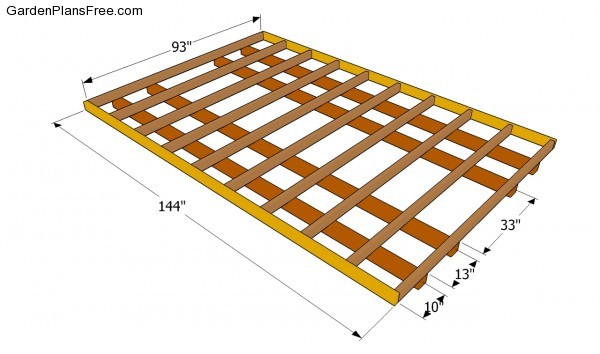
Building the floor frame
The first step of the project is to build the frame of the floor. 画像にあるように、2×6根太を使い、剛性の高いフレームを作る必要があります。 根太に下穴を開け、通常の梁に3 1/2″の亜鉛メッキビスを差し込みます。
根太は24本おきにすると、合板をうまく貼ることができません。

合板フローリング貼り
床の枠に3/4″舌溝合板を貼り、1/4″亜鉛めっきネジで固定する。
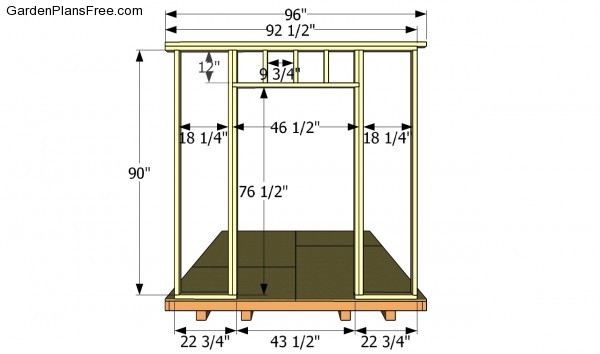
Front wall plans
lean to shedの前壁を作るのは、適切なプランと高品質の材料を使えば、特に簡単にできます。 無料のプランにあるように、ドアの開口部を専門的な方法でフレーム化し、剛性の高い構造を作成する必要があります。 高価なミスを防ぎたいなら、細心の注意を払って作業してください。
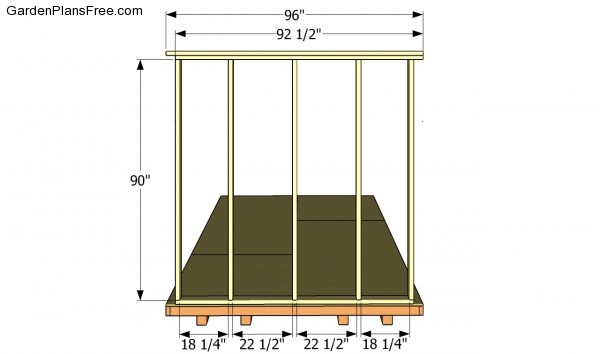
裏壁プラン
小屋の裏壁をプラン通りに作ってください。
Side wall plans
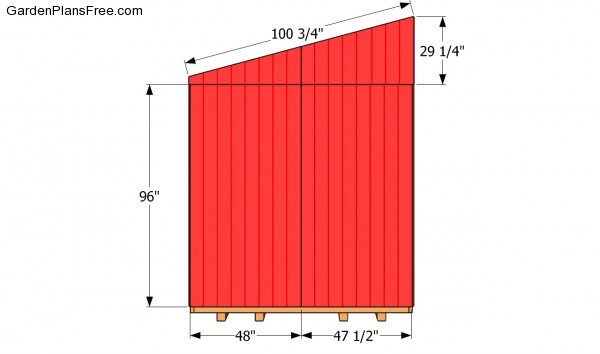
同じ要領で、高い側の壁を組み立ててください。 私たちの計画は、外壁サイディングの4×8″シートに最適化されているため、画像のようにスタッドを配置します。 各部材をはめ込んだ後、角が直角になっているかどうか確認してください。
側壁プラン
短い側壁を作るのは簡単なプロセスです。 スタッドを適当な大きさに切り、上下の板で挟んで固定するだけです。 スタッドはフリープランのように等間隔に配置します。

壁枠の取り付け
壁枠を設置する際は友人に手伝ってもらうとよいでしょう。 画像にあるように、壁が平らであることを確認した後、フローリングの上に壁枠を置き、根太に4 1/2″木ねじで固定する必要があります。
サイディングの取り付け

前壁へのサイディング取り付け
小屋の外面を覆うには5/8″溝付き合板を使用します。 画像にあるように、ドアの開口部の周りに合わせるため、シートの内側にサイディングの小片を切り取る必要があります。
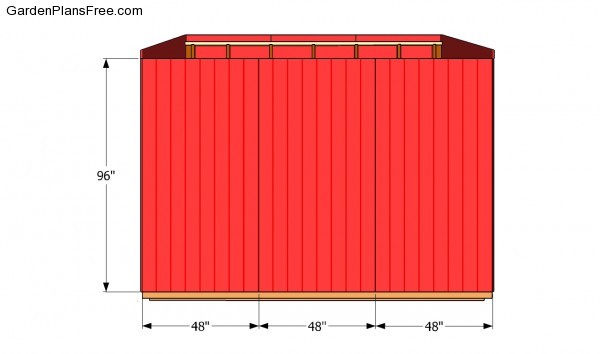
サイディング – 裏壁
裏壁へのサイディング取り付けは、当社の指示に従って、舌と溝のある5/8″合板を使えば簡単に行うことができます。 Work with attention and with great care, making sure you don’t leave any gaps between the sheets.
Attaching the siding
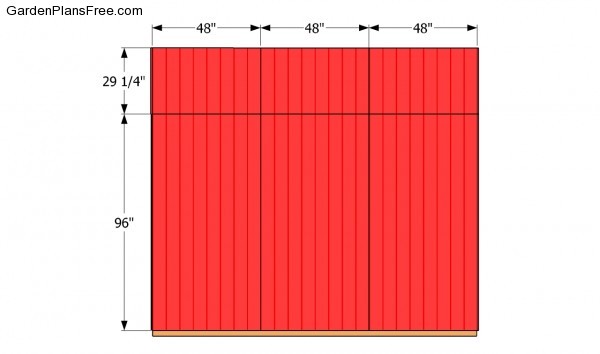
Attach 5/8″ siding to the side walls, following the pattern described in the image. In order to get a professional result, we strongly recommend you to insert 1 1/4″ finishing nails into the studs, every 6-8″. Work with attention and with great care, as to prevent potential issues.
Siding – Side wall
Continue the project in the same manner as described above. Align the sheets at the top edge of the plate and lock it into place with finishing nails.
Building the lean to roof
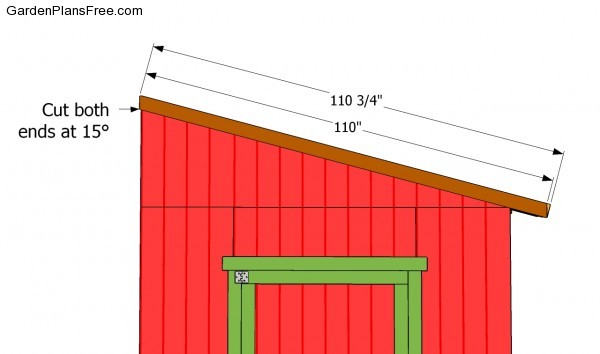
Rafter plans
Building the roof of the lean to shed is a simple and quick process, if the right plans and instructions are used. 画像にあるように、2×4材で垂木を作り、3 1/2″木ねじで天板に固定する必要があります。
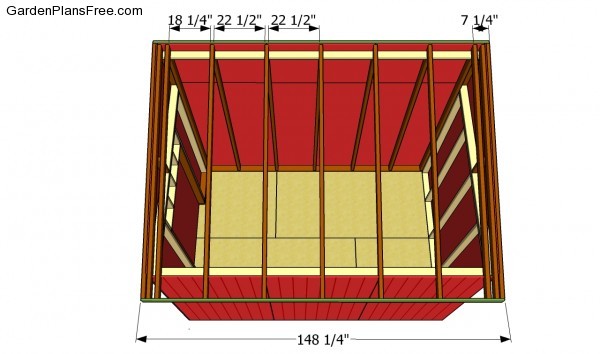
垂木の設置
垂木を天板の上に置き、画像のような間隔で配置します。 垂木の両端に下穴を開け、3.5″亜鉛メッキネジで固定します。

屋根板の取り付け
図面のように、垂木の上に3/4″舌溝合板を貼付ける。 屋根の下から順に取り付け、1/4″木ねじで垂木に固定します(6~8″ごと)。
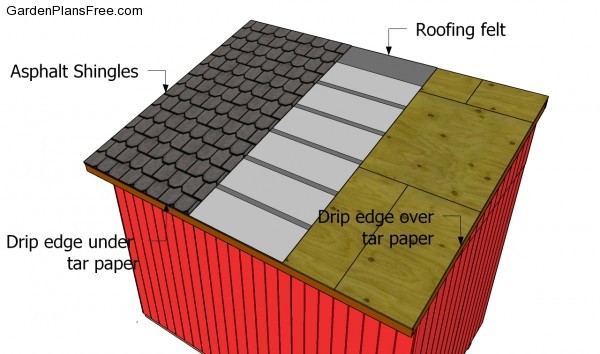
屋根材の設置
小屋を防水するために、屋根材をフェルトで覆わなければならない。 ルーフィングフェルトのストリップが少なくとも2〜3″重なり、8″ごとに合板シートにホチキスで固定することを確認してください。 アスファルトの帯状疱疹をインストールすることによって、プロジェクトを続行します。
プロヒント:帯状疱疹をインストールする前に、常に、メーカーの指示を読んでください。
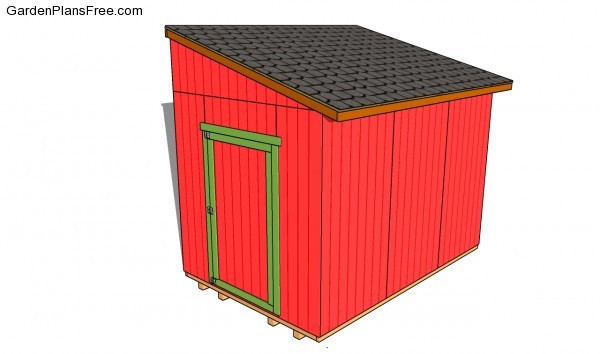
lean to shed plans free
屋根とアスファルトの屋根板を設置したら、世話をしなければならないいくつかの仕上げが残っている。
プロからのアドバイス:小屋の外観を良くし、腐敗から保護するために、木製の部品に塗料を数回塗ります。 小屋のドアの作り方については、このプロジェクトの他の部分をチェックすることを忘れないでください。 また、「10×12物置の設計図」のページもご覧ください。